
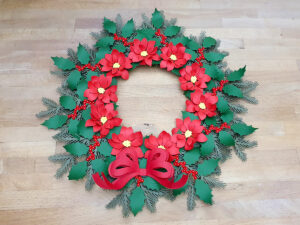
Making a Christmas Wreath with Claina Palmer Designs Blooming ‘ansome Dies
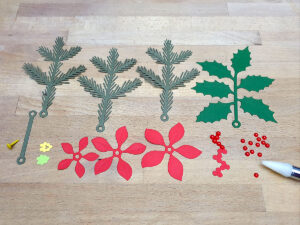
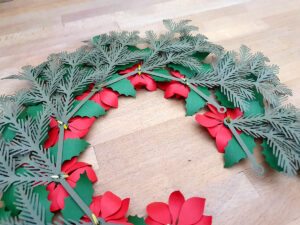
1. The first step is to choose which flowers and foliage from the Christmas Blooming ‘ansome collections you would like to use for your wreath. To make each of my ‘bunches’, I’ve chosen 1 sprig of Holly, 3 Fir Branches and a Poinsettia along with a connector and a brad. I decorated my Holly Berries with 4mm flat backed pearls and set aside to dry.
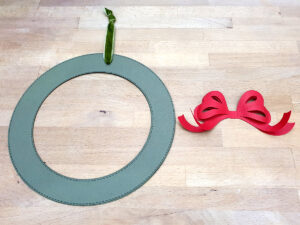
2. Using the Double Stitched Nesting Circle Dies, I created a hanger for my wreath. I used 2 circle dies and a tag creator, I cut 3 layers of card to make it sturdy then I threaded it with ribbon. I cut the wreath bow twice, I added some shape and glued the two bows together in the middle.
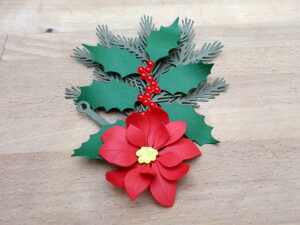
3. Once the glue was dry on my Holly Berries, I assembled 10 ‘bunches’. I added some shape to all of my pieces then threaded the Poinsettia onto my brad followed by the Holly, the Fir and lastly the connector. I glued the 2 layers of the brad covers together, domed them slightly and adhered them into place to form the middle of my Poinsettia.
4. To assemble the wreath, flip over all of your bunches and link them together using the connectors.
5. Place a glue dot onto the back of each brad.
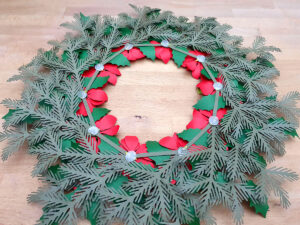
6. Place your wreath hanger circle over your glue dots and press to secure it.
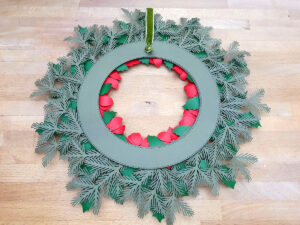
7. Now you can flip over your completed wreath and attach your bow.
8. Hang it and admire your work!
You can create an array of wreaths and garlands using the Blooming ‘ansome range from Claina Palmer Designs, why not create swags to adorn the top of your mirrors and photo frames or small wreaths for the base of your electronic candles? With 10 different Blooming ‘ansome collections to chose from, you can create wreaths for all seasons!
https://www.clainapalmer.com/index.php?route=product/category&path=1_8
Please share what you create in our facebook group, we’d love to see it! 🙂